
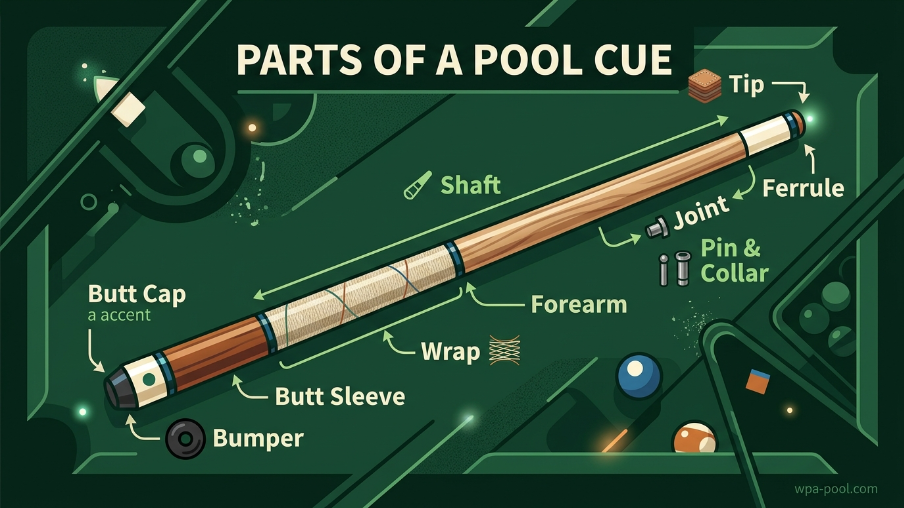
Understanding the parts of a pool cue can completely transform how you approach your game. I spent years playing without knowing what each component actually did, and once I learned the anatomy, my equipment choices became much smarter.
A pool cue is essentially a tapered stick designed to strike billiard balls with precision. Every cue breaks down into two main sections: the shaft (the front hitting portion) and the butt (the rear grip section). These connect at the joint to form your complete playing tool.
Here are all the components from front to back:
- Tip – The leather contact point that strikes the cue ball
- Ferrule – The white collar protecting the shaft below the tip
- Shaft – The tapered front half that delivers power to the ball
- Joint – The connection point between shaft and butt
- Collar – The ring protecting the joint area
- Forearm – The main visible body of the butt section
- Wrap – The grip material on the handle
- Butt Cap – The flat end where your palm rests
- Bumper – The rubber protector at the very rear
Knowing these terms helps when you need replacement parts or want to understand why your cue behaves a certain way. Let me break down each component and explain exactly what it does for your game.
Table of Contents
The Tip: Your Connection to the Cue Ball
The tip is the only part of your cue that actually touches the cue ball. This small leather dome (typically 12mm to 14mm in diameter) determines how much spin, power, and control you can apply to every shot.
Tip hardness matters more than most players realize. Soft tips hold chalk better and provide more grip on the ball, making them ideal for applying english and spin. Hard tips last longer and transfer more power, which is why break cues typically feature hard or even phenolic tips. Medium tips offer a balance that works well for most players.
Tip replacement becomes necessary when you notice the leather wearing down or mushrooming over the ferrule. From my experience and what I have heard from regular players at my local hall, expect to replace your tip every 6 months with frequent play. Casual players might go 12 to 18 months between replacements.
When you do replace a tip, use super glue gel or specialized cue tip cement. Regular super glue works in a pinch, but dedicated tip adhesive provides better shock absorption and a stronger bond.
The Ferrule: The White Collar Between Tip and Shaft
The ferrule sits directly below the tip and serves a critical protective function. This white or ivory-colored ring absorbs the impact shock from each shot, preventing the shaft wood from splintering or cracking.
Modern ferrules are typically made from phenolic resin, high-density fiber, or synthetic ivory alternatives. Phenolic ferrules are nearly indestructible and popular on break cues. Fiber ferrules offer excellent shock absorption for playing cues. Some custom cues still use real ivory, though this has become rare due to regulations and cost.
A quality ferrule should be flush with the shaft and free from cracks or chips. If you notice your ferrule cracking, replace it immediately to protect your shaft investment.
The Shaft: The Heart of Your Pool Cue
If you ask any serious player what the most important part of a pool cue is, they will point to the shaft. This tapered front section determines how the cue feels, flexes, and delivers energy to the ball.
Most quality shafts are made from hard rock maple, chosen for its straight grain and consistent density. Maple shafts typically measure 12mm to 13mm in diameter at the joint, tapering down to about 9mm to 10mm near the tip. The pro taper (constant diameter for the first 12 inches) has become standard because it allows your bridge hand to slide smoothly during strokes.
Shaft construction directly affects your game in ways the butt never can. The wood’s density, the quality of the splice, and the straightness of the grain all influence how energy transfers to the ball. A good shaft feels alive in your hands and provides feedback you can learn from.
Some manufacturers now offer carbon fiber shafts as an alternative to wood. These offer advantages in durability and consistency, though many traditional players still prefer the feel of maple.
The Joint: Where Shaft Meets Butt
The joint is the mechanical connection that holds your two-piece cue together. While simple in concept, joint design significantly affects how solid your cue feels and how easily you can break it down for transport.
The most common joint pin types are:
Radial Pin: This pin threads directly into the shaft and provides excellent stability with minimal wobble. Many high-end cues use this design, and players consistently rate it as one of the most secure connections.
Uni-loc: Known for its quick-release design, the Uni-loc allows fast assembly and disassembly. However, regular players report that these joints tend to loosen over time and require periodic tightening to maintain a solid hit.
3/8×10 Modified (flat bottom): This traditional joint pin features a flat bottom that creates a very tight, solid connection. The modified flat-bottom version is particularly popular among players who prioritize feedback and a dead-solid hit.
3/8×11: Similar to the 3/8×10 but slightly larger, this joint also suffers from loosening issues over time according to community feedback.
Joint collars protect the wood around the connection point and can affect the cue’s appearance significantly. Stainless steel collars are durable, while various woods and synthetics offer aesthetic variety.
The Collar and Rings: Style Meets Function
Collars sit at both ends of the joint, protecting the wood from impact and wear. These rings are typically made from metal, exotic woods, or synthetic materials. While primarily decorative, quality collars do add structural protection.
Accent rings appear throughout the cue design, often as thin lines between different wood sections. These serve no functional purpose but allow cue makers to showcase craftsmanship and create distinctive visual identities for their products.
The Forearm: The Visual Centerpiece
The forearm is the main body of the butt section, extending from the joint down to the wrap area. This is where cue makers display their artistry through wood selection, inlays, and design elements.
Common forearm woods include maple, ebony, cocobolo, bocote, and zebrawood. While the forearm wood affects the cue’s appearance and balance, experienced players know it does not significantly change how the cue plays. The shaft determines performance. The forearm determines aesthetics and weight distribution.
Some forearms feature intricate inlays of mother-of-pearl, exotic woods, or synthetic materials. These decorative elements can add hundreds or thousands of dollars to a cue’s price without affecting playability.
The Wrap: Your Grip Connection
The wrap covers the handle area where your back hand grips the cue. This component directly affects comfort, sweat absorption, and grip consistency during long playing sessions.
Linen wraps are the traditional choice, offering excellent sweat absorption and a classic look. The Irish linen texture provides consistent grip even when your hands get warm.
Leather wraps offer a softer, more luxurious feel. They require more maintenance but mold to your grip over time for a personalized fit.
Rubber or synthetic wraps provide maximum grip in humid conditions. These are popular in tropical climates or for players who sweat heavily.
No-wrap cues feature smooth wood or textured finishes directly on the handle. Some players prefer the direct wood contact and cleaner appearance.
Your wrap choice should match your playing environment and personal comfort preferences. There is no universally “best” wrap, only what works for your specific needs.
The Butt Cap and Bumper: Protection at the Rear
The butt cap covers the very end of your cue, providing a smooth surface where your palm rests during shots. This small component affects comfort more than most players realize. A well-designed butt cap eliminates sharp edges and provides a natural hand position.
The bumper extends beyond the butt cap, made from rubber or synthetic material. This protective extension serves multiple purposes. It cushions the cue when you set it down on hard surfaces. It protects the butt from damage if the cue falls or hits something. It prevents damage to pool table rails when the cue rests against them.
Never remove your bumper to make the cue shorter. This exposes the end grain to moisture and impact damage, significantly shortening your cue’s lifespan.
How to Identify and Replace Pool Cue Parts
When you need replacement parts, accurate identification becomes essential. Start by measuring your tip diameter with calipers. Tips should be purchased slightly oversize (about 1mm larger than your shaft) and sanded down for a perfect fit.
Joint identification requires looking at both the pin type and diameter. Take your cue to a professional if you are unsure, as incompatible parts can damage your cue. Most cue makers stamp or engrave their joint specifications somewhere on the butt.
Wrap replacement is a job best left to professionals unless you have experience. The old wrap must be completely removed, the handle surface prepared, and the new material installed with even tension.
Professional cue repair typically costs $60 to $80 for basic reconditioning including tip replacement and cleaning. A full refinish with new shafts can run several hundred dollars but is often worth it for a beloved cue with sentimental value.
FAQ: Common Questions About Pool Cue Anatomy
What are the parts of a pool cue called?
A pool cue consists of the tip, ferrule, shaft, joint, collar, forearm, wrap, butt cap, and bumper. The two main sections are the shaft (front) and butt (rear), which connect at the joint. Each component serves a specific function in delivering power, providing grip, and protecting the cue.
What is the most important part of a pool cue?
The shaft is considered the most important part of a pool cue. It determines how energy transfers to the ball, affects shot feel and feedback, and directly impacts your ability to control spin and power. While the butt provides grip and balance, the shaft is where performance happens.
How often should a cue tip be replaced?
Most players should replace their cue tip every 6 to 12 months with regular play. Signs you need a new tip include visible wear, mushrooming over the ferrule edges, loss of shape, or reduced chalk retention. Casual players might go 18 months between replacements, while daily players may need new tips every 3 to 6 months.
What’s the best glue for cue tips?
Super glue gel or specialized cue tip cement works best for attaching tips. Regular super glue bonds too rigidly and can affect feel. Professional tip adhesives offer shock absorption and stronger bonds. Avoid wood glue or epoxy as they lack the flexibility needed for impact absorption.
Conclusion: Master Your Equipment by Understanding Its Anatomy
Understanding the parts of a pool cue helps you make informed decisions about equipment purchases, maintenance, and repairs. Each component from the leather tip to the rubber bumper plays a role in your playing experience.
Remember that the shaft determines performance while the butt provides grip and balance. Focus your upgrade budget on quality shafts and tips before investing in fancy forearm inlays. With this knowledge, you can maintain your cue properly and choose replacement parts with confidence.