
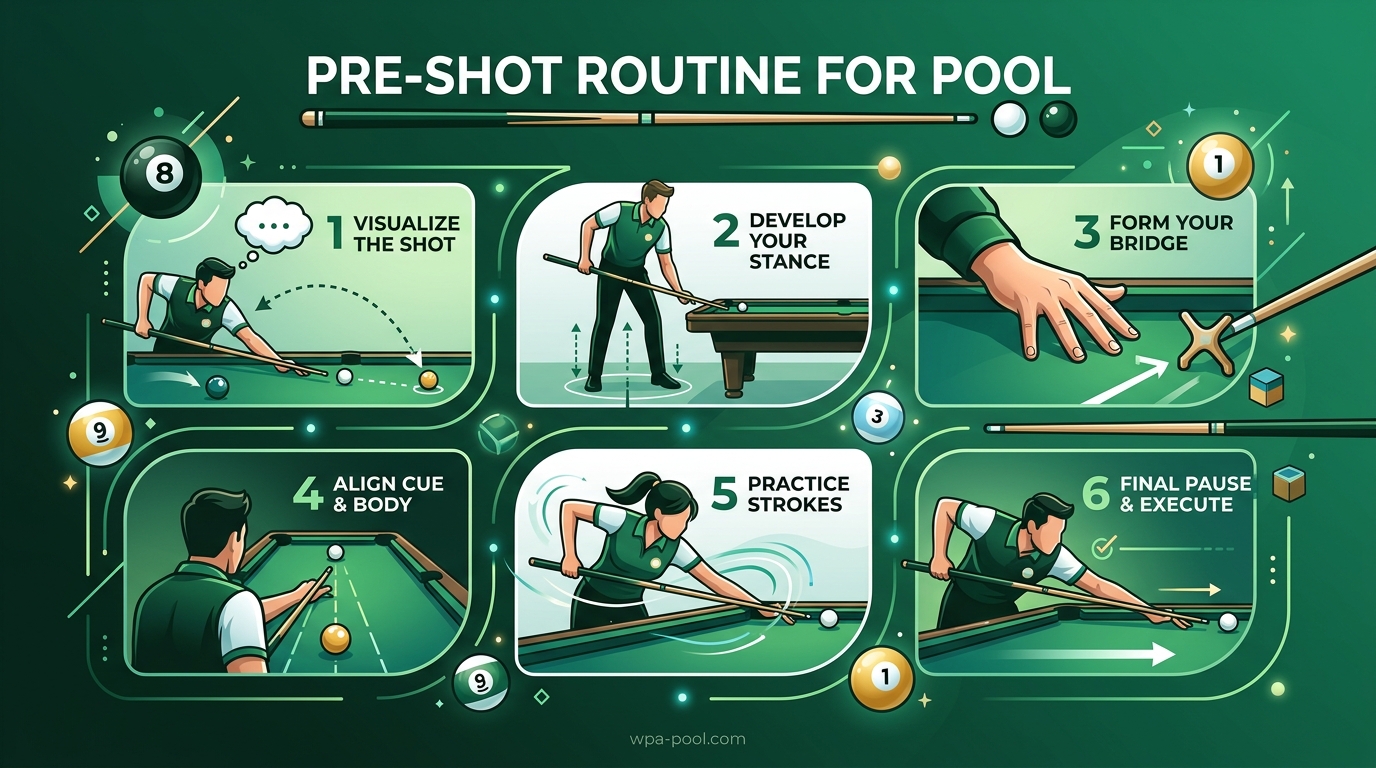
Ever stood over a shot knowing exactly where the cue ball needs to go, only to watch it slide harmlessly past the pocket? I have been there more times than I care to admit. The difference between average players and consistent shooters often comes down to one thing: a solid pre-shot routine for pool that prepares both body and mind before every single stroke.
A pre-shot routine is the systematic series of steps you follow before executing any shot. It is not just about going through motions. It creates the consistency that transforms random success into repeatable performance. Whether you are a beginner learning pool basics or an intermediate player looking to break through a plateau, developing your own routine will change how you approach every shot at the table.
In this guide, I will walk you through exactly what makes an effective pre-shot routine, break down each component step by step, share insights from professional players, and show you how to customize a routine that fits your style. By the end, you will have a clear framework you can start using immediately to improve your consistency and confidence at the table.
Table of Contents
What Is a Pre-Shot Routine in Pool?
A pre-shot routine in pool is a consistent sequence of physical and mental actions you perform before every shot. Think of it as your personal ritual that bridges the gap between deciding what to do and actually doing it. Professional players treat their routines with near-religious devotion because they understand something critical: the routine is where the shot is won or lost before the cue ever strikes the ball.
Your routine typically starts the moment you begin analyzing the table layout and continues until you complete your follow-through. It includes visual assessment, mental visualization, physical positioning, breathing patterns, practice strokes, and the final execution. Every element serves a purpose. Nothing is random. The goal is creating a repeatable process that puts you in the same mental and physical state for every shot, regardless of pressure or situation.
The beauty of a pool pre-shot routine is that it is completely individual. Some players use elaborate sequences with multiple practice strokes and deep breathing exercises. Others prefer minimalist approaches with just a few essential steps. What matters is not complexity but consistency. Your brain and body learn to recognize the routine as a signal that it is time to perform, triggering muscle memory and focused concentration automatically.
Why a Pre-Shot Routine Matters for Your Game
I spent my first three years playing pool without any consistent routine. Some shots felt effortless while others fell apart completely, and I could never predict which would be which. Once I committed to developing a structured pool shooting routine, my consistency improved dramatically within weeks. Here is why routines make such a profound difference.
Consistency through muscle memory. Every time you repeat your routine, you reinforce neural pathways that make proper technique automatic. Your stance, grip, bridge, and stroke pattern become ingrained habits rather than conscious decisions. This frees your mind to focus on shot execution rather than mechanics.
Improved mental focus. The routine acts as a trigger that tells your brain it is time to concentrate fully on the present shot. External distractions fade away. Previous misses stop haunting you. Future shots stop tempting your attention. You enter a focused state where only the current shot exists.
Anxiety reduction under pressure. Competitive situations create nervous energy that destroys fine motor control. A familiar routine provides comfort and confidence when stakes are high. The familiar steps ground you and remind your body that you have made thousands of similar shots successfully before.
Better decision-making. When you follow a consistent process, you naturally slow down and think through shots more carefully. Rushing leads to poor choices. Your routine creates space to verify the right shot, check your aim line, and confirm your position play before committing.
Confidence building. There is something powerful about knowing you have prepared properly for every shot. Even when you miss, you can trace the cause rather than wondering what went wrong. This analytical approach builds confidence faster than random success ever could.
How to Develop a Pre-Shot Routine for Pool: Step-by-Step Guide
Creating your personal pre-shot routine means building a sequence that feels natural while covering all essential elements. After testing various approaches and studying how professionals work, I have broken the process into eight clear steps. Practice these individually, then link them together into your complete routine.
Step 1: Assess the Table and Plan Your Shot
Stand back from the table and take in the full layout. Identify your target ball and intended pocket. Look at cue ball position after contact to ensure you are planning for position play, not just making the current shot. This is your strategic phase. Do not rush it.
Decide definitively what you are attempting before moving forward. Indecision here destroys everything that follows. Pick your shot, commit to it, and trust your judgment. Second-guessing during execution is a recipe for disaster.
Step 2: Visualize the Shot in Detail
Close your eyes or soften your focus while standing upright. Picture the cue ball striking the object ball at the exact contact point needed. See the object ball rolling cleanly into the pocket. Visualize the cue ball traveling to its intended landing zone.
Professional player Jeanette Lee emphasizes picturing three things clearly: the cue ball path to contact, the object ball dropping into the pocket, and the cue ball rebounding to your planned position. This mental rehearsal primes your brain for success and builds confidence before you ever bend over the table.
Step 3: Find the Aim Line Behind the Cue Ball
Position yourself behind the cue ball and sight along your intended path. Look from the cue ball to the object ball to the pocket. Roughly ninety percent of your aiming should happen standing upright with your vision center aligned properly. You get a clearer view of angles from this position than you will once down on the shot.
Some players use their cue as a sighting tool, extending it along the aim line to verify their perception matches reality. Others simply use their eyes and head position. Find what works for you and make it consistent.
Step 4: Get Into Your Stance
Approach the table from behind your aim line. Step into your stance with your bridge foot first, placing it at the proper distance from the cue ball for your body proportions. Your back foot follows naturally, creating a stable base that feels balanced and grounded.
Bend forward from your hips while keeping your back relatively straight. Your head should lower onto the cue smoothly as your bridge hand settles into position. The entire movement should feel fluid and rehearsed, not awkward or rushed. Good pool stance fundamentals create the foundation for everything that follows.
Step 5: Establish Your Bridge and Grip
Place your bridge hand at the appropriate distance from the cue ball for the shot type. An open bridge works well for most shots and provides stability. A closed bridge offers more support for power shots or when using extreme english. Choose based on the situation, but be consistent in how you form each type.
Your grip hand should hold the cue firmly enough to maintain control but loosely enough to allow smooth acceleration. Most players grip too tightly, creating tension that restricts fluid motion. Imagine holding a baby bird: firm enough that it cannot escape, gentle enough that you do not harm it. This grip pressure pool technique takes practice to perfect.
Step 6: Take Consistent Practice Strokes
With your tip near the cue ball, begin your practice strokes. These warm-up movements groove your muscle memory and prepare your body for the final execution. Most players use between two and four practice strokes, though some professionals use more or fewer depending on shot complexity.
Your practice strokes should mimic your final stroke exactly. Same tempo, same length, same follow-through intention. They are not just nervous habits but deliberate rehearsals of the shot to come. Pay attention to how the cue feels moving through your bridge hand. Notice any tension in your grip and consciously relax it.
Step 7: Final Focus and Execution
Pause briefly at the end of your final practice stroke. Take a moment to verify your aim one last time. Some players have a specific trigger phrase they say silently: “smooth,” “trust it,” or simply “ready.” This mental cue signals the transition from preparation to execution.
Draw the cue back slowly with a smooth, controlled motion. There should be no hesitation or hitch at the back of your stroke. Accelerate forward through the cue ball with confidence and commitment. A tentative stroke rarely produces good results. Trust your preparation and execute with conviction.
Step 8: Follow Through and Stay Down
Continue your cue forward through the cue ball with a full, natural follow through. Your grip hand should finish near or touching your chest. The cue tip should end pointing along your intended path. Cutting your follow through short almost always produces poor results.
Crucially, stay down after the shot until the balls stop moving. This is one of the most common errors amateur players make. Popping up immediately destroys your consistency and often causes you to steer the cue off line at the last moment. Force yourself to remain in position, watching the outcome calmly, until all motion stops.
The Physical Elements of Your Routine
While the mental game gets much attention, the physical components of your pre-shot routine deserve equal focus. Your body position determines whether your stroke can succeed regardless of how well you visualized the shot. Let me break down the key physical elements that need attention.
Stance fundamentals and foot position. Your feet create your foundation. The front foot typically points toward the shot line while the back foot angles slightly for balance. Weight distribution should feel centered, not leaning dramatically toward either foot. Experiment with foot spacing to find what lets you stay low comfortably without straining.
Bridge hand placement techniques. Your bridge is the cue’s guide during the stroke. Place it at a distance that lets you achieve a flat trajectory to the cue ball without reaching awkwardly. For most shots, eight to twelve inches from the cue ball works well. Closer bridges offer more control for soft shots. Longer bridges provide power for draw or follow shots.
Grip pressure and relaxation. Tension is the enemy of smooth stroke technique. Check your grip pressure during practice strokes by consciously squeezing tighter then releasing until you find the minimum pressure that maintains control. Your forearm should feel loose and free to swing like a pendulum.
Body alignment and posture. Your head, spine, and back leg should form a stable structure while your stroking arm moves freely. Keep your chin close to the cue for consistent sighting but do not strain your neck. Your back should be relatively flat, not hunched or arched dramatically.
Cue ball alignment methods. Verify your cue is aimed correctly by checking the alignment of your cue tip, cue ball, and intended contact point. Some players look at the cue ball last before stroking. Others focus on the object ball or the pocket. Find your personal preference and stick with it.
Mental Preparation: The Hidden Key to Consistency
The physical mechanics get you into position, but your mental state determines whether you execute successfully. Professional players spend enormous energy on the mental game because they know it separates winners from also-rans. Here are the mental preparation techniques that make the biggest difference.
Visualization techniques for pool. Before every shot, create a vivid mental movie of success. See the balls moving exactly as intended. Feel the smooth stroke in your imagination. Hear the sound of the ball dropping in the pocket. The more sensory details you include, the more powerful the visualization becomes.
Breathing and relaxation methods. Controlled breathing calms your nervous system and sharpens focus. Try inhaling deeply as you approach the table, holding briefly while getting into stance, then exhaling slowly during your practice strokes. This pattern naturally reduces tension and creates rhythm.
Some players use a specific breathing count: in for four counts, hold for two, out for six. Others simply focus on making their exhales longer than their inhales, which activates your parasympathetic nervous system and reduces anxiety. Experiment to find what keeps you calm and centered.
Trigger words and phrases. Many professionals use a short word or phrase as a mental cue that signals readiness. “Trust it,” “smooth stroke,” or “commit” work well. Say your trigger word silently during that final pause before execution. It serves as a mental switch that transitions you from preparation mode to action mode.
Clearing mental distractions. Thoughts about previous misses, score pressure, or spectators watching can destroy your focus. Develop a ritual for clearing these distractions. Some players wipe their cue with a cloth as a symbolic fresh start. Others tap the table twice to signal “reset.” Find a gesture that helps you return to the present moment.
Building confidence before the shot. Remind yourself of successful similar shots you have made. Confidence comes from evidence, not wishful thinking. Your routine itself becomes a confidence builder. When you know you have prepared properly, doubt has less room to creep in.
Common Pre-Shot Routine Mistakes to Avoid
After talking with hundreds of players and reading countless forum discussions, I see the same errors appearing repeatedly. Learning from these common pre-shot routine mistakes will save you months of frustration.
Rushing through the routine. Tournament pressure or simple excitement makes players hurry. They skip visualization, take fewer practice strokes, and jump into shots before truly ready. Slow down deliberately. Your routine should take roughly the same amount of time whether you are practicing alone or playing in a championship final.
Inconsistent practice strokes. If your warm-up strokes differ from your final stroke in tempo, length, or intention, you are preparing for failure. Your body learns from every repetition. Make sure practice strokes are honest rehearsals of the real thing.
Overthinking and second-guessing. Analysis happens before the routine begins. Once you start your sequence, commit fully to your decisions. Constantly rechecking aim or changing your mind while down on the shot creates tension and destroys confidence. Trust your preparation or restart the routine entirely rather than executing with doubt.
Poor breathing habits. Holding your breath during the stroke is incredibly common and incredibly harmful. It creates tension throughout your body and restricts smooth motion. Consciously exhale during your forward stroke. The rhythm of breath should flow naturally through your entire routine.
Not staying down after the shot. Popping up immediately to see results is perhaps the most widespread error among amateur players. Stay committed to your position until balls stop moving. This discipline improves your mechanics and teaches you to accept outcomes calmly rather than reacting emotionally.
Professional Insights: How Pros Approach Their Routines
Studying how professional players structure their routines offers invaluable guidance. While each pro has personal variations, certain patterns emerge consistently across elite players. These insights come from tournament observation, instructional videos, and published interviews.
Jeanette Lee’s visualization approach. The Black Widow emphasizes mental preparation before physical positioning. She stands well back from the table, visualizing not just the shot but the entire sequence of events. Her quote resonates with many players: “I picture the cue ball hitting the object ball, the object ball falling into the pocket, and the cue ball moving to exactly where I want it. Only then do I approach the table.” This mental clarity before physical action distinguishes professionals from amateurs.
Darren Appleton’s systematic breakdown. The English champion uses a ten-step routine he follows religiously. His approach demonstrates that complexity works when you own it completely. Every step has purpose and timing. Nothing is random. For competitive players, his method shows how detailed routines can be under pressure when properly internalized through repetition.
Niels Feijen’s calm intensity. The Dutch powerhouse exemplifies how routine creates emotional stability. His pre-shot sequence looks identical whether he is breaking and running in a final or practicing alone. This consistency under varying pressure levels comes from treating every shot with the same respect and preparation.
Simplicity versus complexity. Some professionals use elaborate multi-step routines while others keep things minimal. There is no single right answer. What matters is choosing an approach you can execute consistently without conscious thought. A simple routine performed perfectly beats a complex routine performed poorly.
Adapting under pressure. Even professionals adjust their routines for high-pressure situations. Some add an extra practice stroke. Others use more deliberate breathing. The key is making intentional adjustments rather than abandoning structure entirely when nerves strike.
Customizing Your Routine for Your Playing Style
The perfect pre-shot routine is the one you actually use consistently. While the eight steps provide a framework, your final routine should reflect your personality, physical characteristics, and playing level. Here is how to customize effectively.
Beginner-friendly simplified routine. If you are just learning the game, start with four essential steps: assess and plan, get into stance with basic alignment, two practice strokes, then execute with follow through. Do not overwhelm yourself with complexity early on. Master the fundamentals first, then add refinements as your comfort grows.
Advanced player refinements. Experienced players can add sophisticated elements like specific breathing patterns, detailed visualization sequences, or personalized trigger words. You might incorporate chalking your cue as a deliberate ritual that signals focus time. The routine can expand as your skills and concentration capacity develop.
Adjusting for different shot types. Your routine should have a base version for standard shots with minor variations for special situations. Breaking requires different timing than delicate touch shots. Bank shots might need extra visualization time. Develop these variations consciously rather than letting them happen randomly.
Building routine duration that works for you. Some players prefer quick routines that maintain rhythm and momentum. Others need longer sequences to settle their minds completely. Neither approach is wrong. Test different durations during practice to discover what produces your best performance. Then maintain that timing consistently.
Adapting when table position is awkward. Sometimes you must shoot from uncomfortable positions where your standard stance does not work. In these cases, keep your mental routine intact even if physical elements must change. Your visualization, breathing, and commitment steps remain constant even when body position changes.
Quick Reference: Your Pre-Shot Routine Checklist
Print this summary and keep it in your case for quick reference until your routine becomes automatic habit.
Preparation Phase (Standing):
- Assess table layout and select shot
- Plan cue ball position after contact
- Visualize the complete shot sequence
- Sight the aim line from behind cue ball
Physical Setup (At the Table):
- Step into stance from behind the shot line
- Establish stable bridge hand position
- Set relaxed, controlled grip
- Align body and verify cue ball alignment
Execution Phase:
- Take consistent practice strokes (2-4 typically)
- Use trigger word or breathing pattern
- Smooth backswing with no hesitation
- Accelerate through cue ball confidently
- Complete full follow through
- Stay down until balls stop moving
Practice this sequence on every shot during your next few sessions. Resist the urge to skip steps when you feel confident or hurry when you feel pressure. Consistency in your routine creates consistency in your results.
Frequently Asked Questions
What is a pre-shot routine in pool?
A pre-shot routine in pool is a systematic series of physical and mental steps a player follows before executing each shot. It typically includes assessing the table, visualizing the shot, getting into stance, taking practice strokes, and executing with proper follow through. The routine creates consistency, builds muscle memory, and helps maintain focus during play.
What is a good preshot routine?
A good preshot routine includes eight key steps: assess and plan your shot, visualize the cue ball path and object ball pocketing, find your aim line from behind the cue ball, get into a stable stance, establish your bridge and grip, take 2-4 consistent practice strokes, execute with a smooth stroke and full follow through, and stay down until the balls stop moving. The best routine is one you can repeat consistently without conscious thought.
What is the 30 rule in pool?
The 30 rule in pool refers to a guideline that you should spend roughly 30 percent of your shot time in the standing position assessing and planning, and 70 percent executing your routine at the table. This ensures you are not rushing your decision-making or overthinking once you get down on the shot. Proper time distribution leads to better shot selection and more confident execution.
What is the 5 second rule in pool?
The 5 second rule in pool suggests that once you begin your final backswing, you should complete the stroke within approximately 5 seconds. Pausing too long at the back of your stroke creates tension and often leads to steering or deceleration. A smooth, continuous motion from backswing through follow through produces the most consistent results.
How many practice strokes should I take?
Most players take between 2 and 4 practice strokes before executing their final shot. Beginners often benefit from 3 or 4 strokes to establish rhythm and relaxation. Advanced players might use only 2 for simple shots or more for complex shots requiring extra preparation. The key is consistency: use the same number for similar shots so your body recognizes the pattern.
Should I restart my routine if my aim looks wrong?
Yes, if something feels significantly off after you have gotten down on the shot, it is better to restart your routine than to execute with doubt. Stand up, step back, and begin again from the visualization phase. Forcing a shot when your alignment feels wrong almost always produces poor results. However, avoid using this as an excuse for indecision: commit fully once you restart.
Conclusion
Developing a pre-shot routine for pool is the single most impactful change you can make to improve your consistency and confidence at the table. The eight-step framework I have shared gives you a proven structure to build from, but remember that your personal routine should feel natural and match your playing style. Start simple, practice diligently, and add complexity only as the basics become automatic.
The players who improve fastest are not necessarily those with the most natural talent. They are the ones who approach every shot with disciplined preparation and committed execution. Your routine is the bridge between knowing what to do and actually doing it well. Build that bridge strong, cross it confidently on every shot, and watch your game transform.
Pick one element from this guide to focus on during your very next practice session. Whether it is adding visualization, improving your breathing pattern, or simply staying down after shots longer, small changes compound over time. Your future self will thank you for the consistency you build today.